
My yarn basket has been sitting on the dining table for a week, and I finally know why. I’m making a photo prop for a newborn — not a sweater, not a blanket. A tiny bug hat and a striped cocoon that will live inside one photoshoot and then be folded away in a drawer.
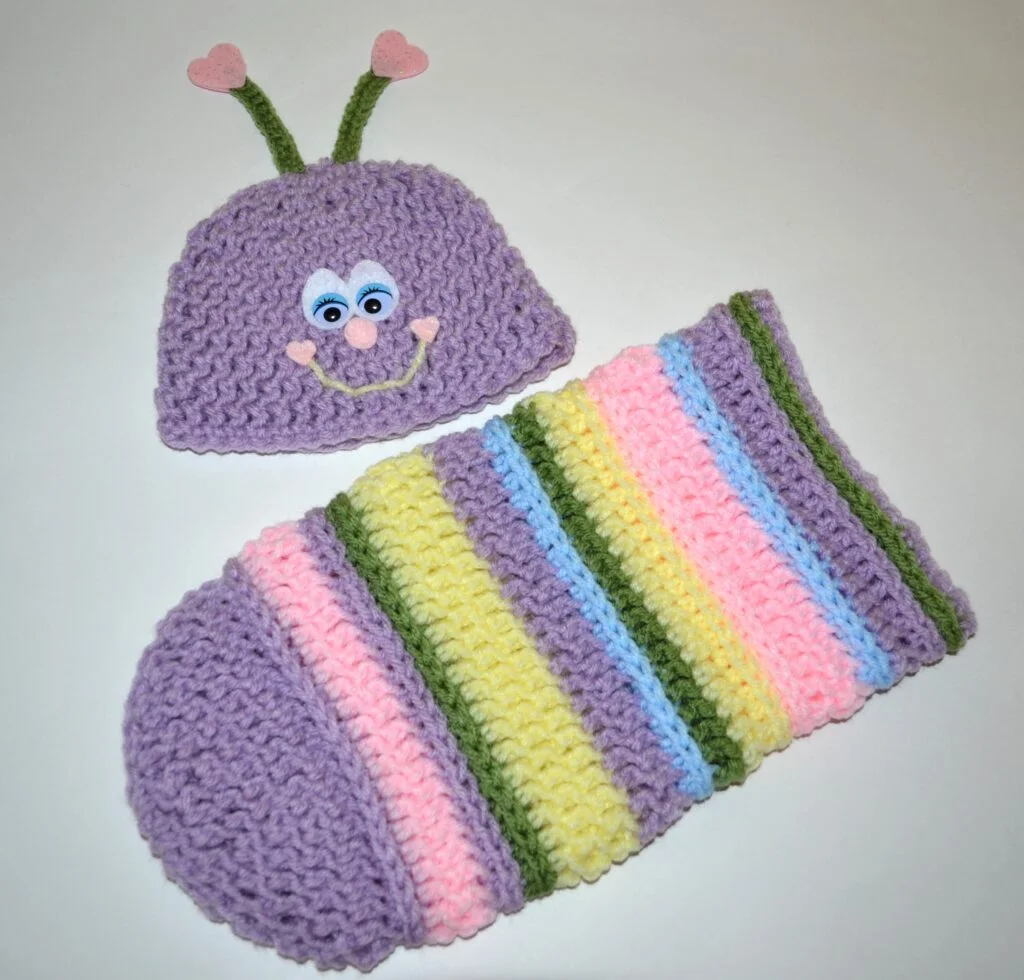
That’s the part I like about this project. You buy almost no yarn, you make it fast, and the result does exactly one job really well: it makes a baby look like the star of the picture. I used to buy the trend first and ask questions later. Now I ask first — and for a last-minute photo session, this is the answer to the question “what do we actually need?”
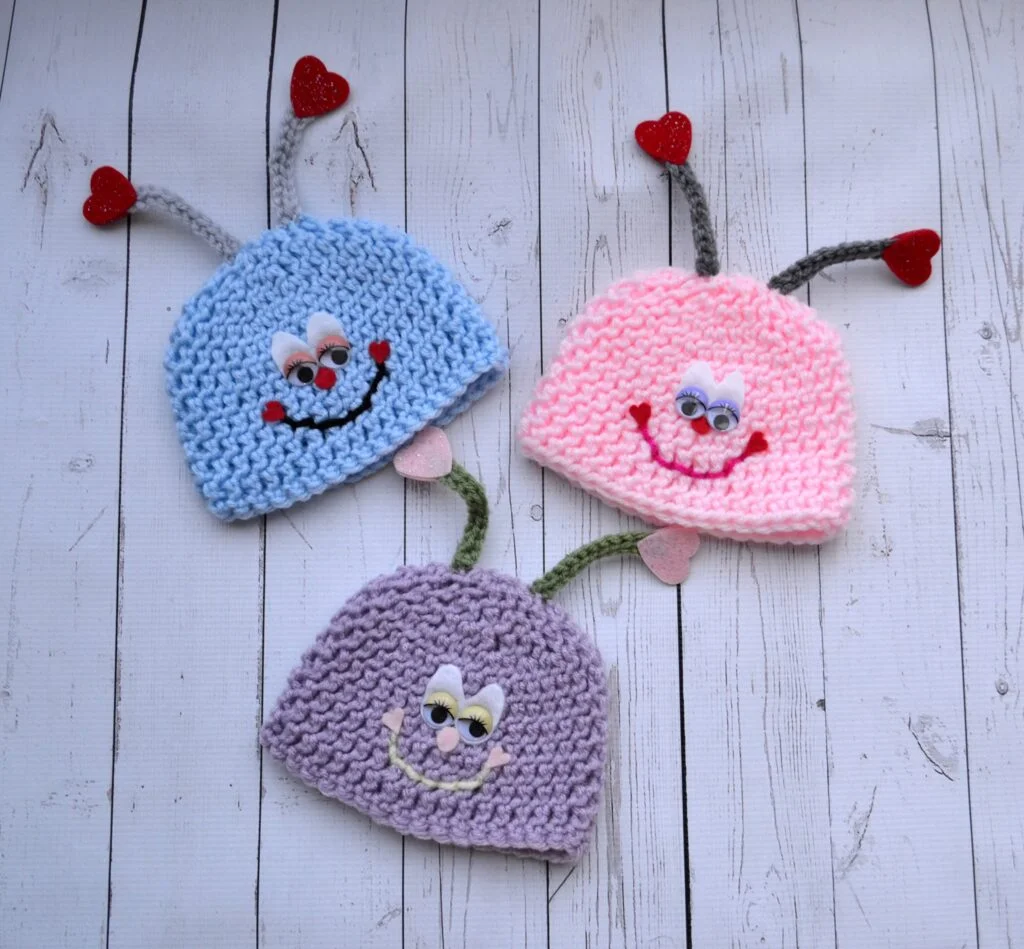
Why this prop works
Before you commit a weekend to anything, here’s what I think you’ll actually get out of it:
- One good photo, not a wardrobe. A baby shower, a hospital announcement, a professional newborn session — this set is built to mark one moment, not to survive 40 laundry cycles. (Which is fine. That’s the point.)
- Season-flexible. The bug shape reads Valentine’s Day or spring, but it works year-round. Swap the colorwork to whatever palette you already own and it fits the season instead of the other way around.
- Fast, and satisfyingly so. Repeating rounds, no shaping puzzles. It’s the kind of project that works up in a short time and keeps you relaxed from the first round to the last.
- Stash-friendly. You only need a small amount of yarn — 300–325 yards total — so it’s the perfect excuse to use up the ends of skeins you’ve been keeping “for something” for two years.
What you’ll need
- Crochet hooks: I (5.5mm), K (6.5mm), L (8mm)
- 300–325 yards worsted weight yarn (#4) — I used 5 colors in the cocoon (one main color plus 4 contrasts)
- Scissors, yarn needle, measuring tape
- googly eyes in multiple sizes“>Googly eyes — I like the traditional ones because they come in multiple sizes. Sleepy googly eyes“>Sleepy eyes work too, if that’s your style.
- Felt scraps in pink and white“>Felt scraps — a very small amount. If you don’t have any, the scraps pack is a good way to get lots of colors without buying full sheets.
- Fabric glue“>Fabric glue
- Helpful to have: a heavy book and a clothespin (both earn their keep in the finishing steps)
Affiliate note: if you order through my links above, I may earn a small commission at no extra cost to you. It keeps the free patterns on this site free.
Skills and finished sizes
Level: Intermediate, but a confident beginner can do it — the only technique that takes practice is the back bar (explained below with photos).
Finished size: newborn (approx. 7–10 lbs)
Hat: 12 ¼” around / 5″ high, fits up to 14″ head circumference
Cocoon: 14″ around / 15″ long
Use: photography prop only — not for sleep or unsupervised wear.
Gauge (don’t skip it)
If the finished prop has to fit a real baby, gauge is not optional. Crochet about 11 rows of 15 half-double crochets, then measure a 4-inch square in the middle of it.
With hook K: 9 rows of 12 hdc = 4 inches square.
If your swatch is bigger than that, go down a hook size and retest. Smaller? Go up. I know it’s tedious. It’s also the difference between “fits” and “almost fits.”
Stitches used
R = Round · Ch = Chain · Slst = Slip Stitch · Sc = Single Crochet · Hdc = Half Double Crochet · BB = Back Bar of the hdc from the previous round.
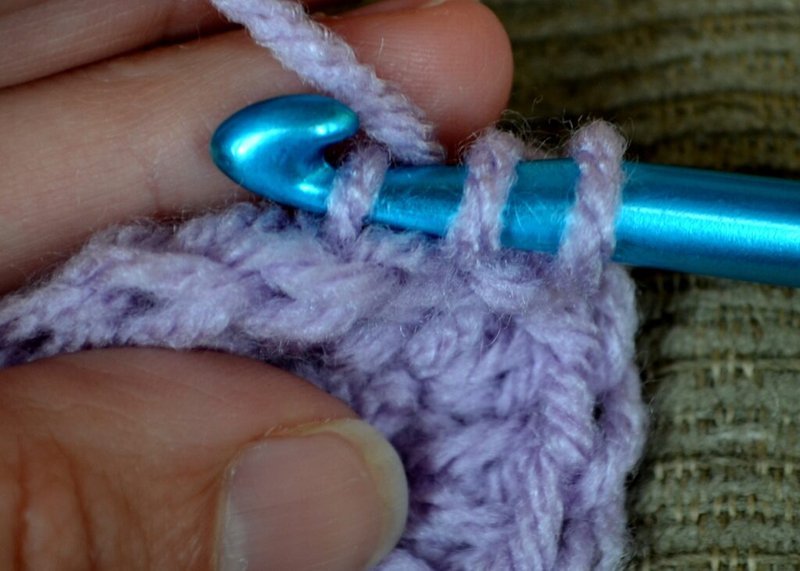
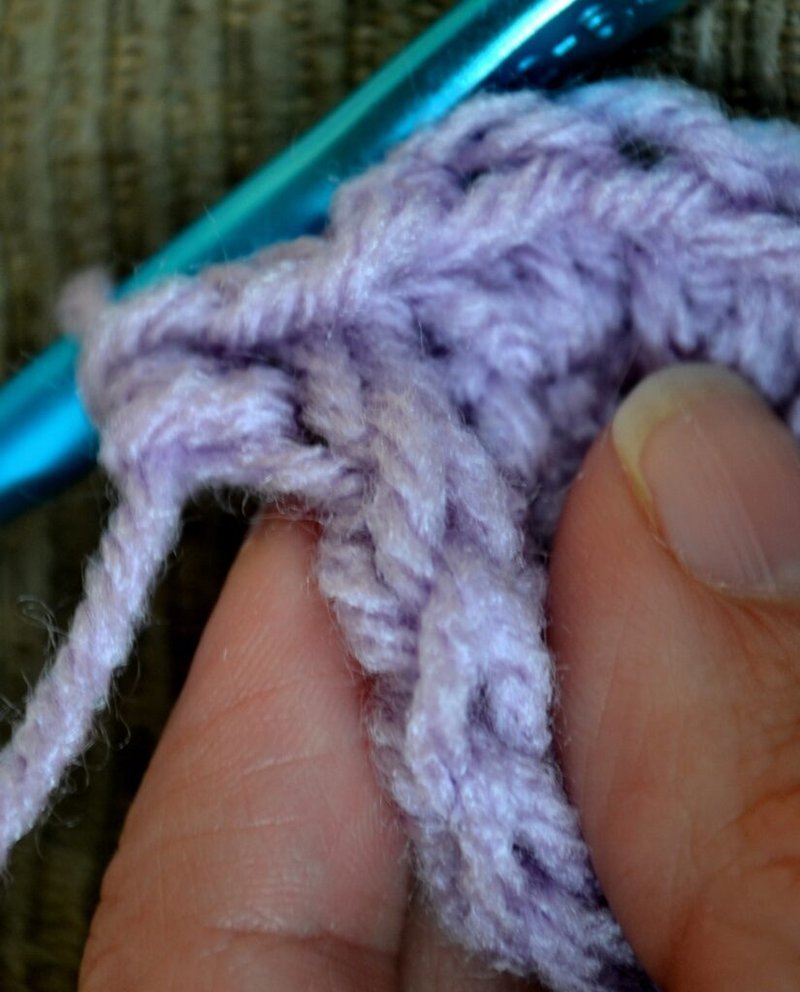
Here’s what the back bar looks like:
You insert into the back bar of the hdc — the top braid of the stitch faces you:
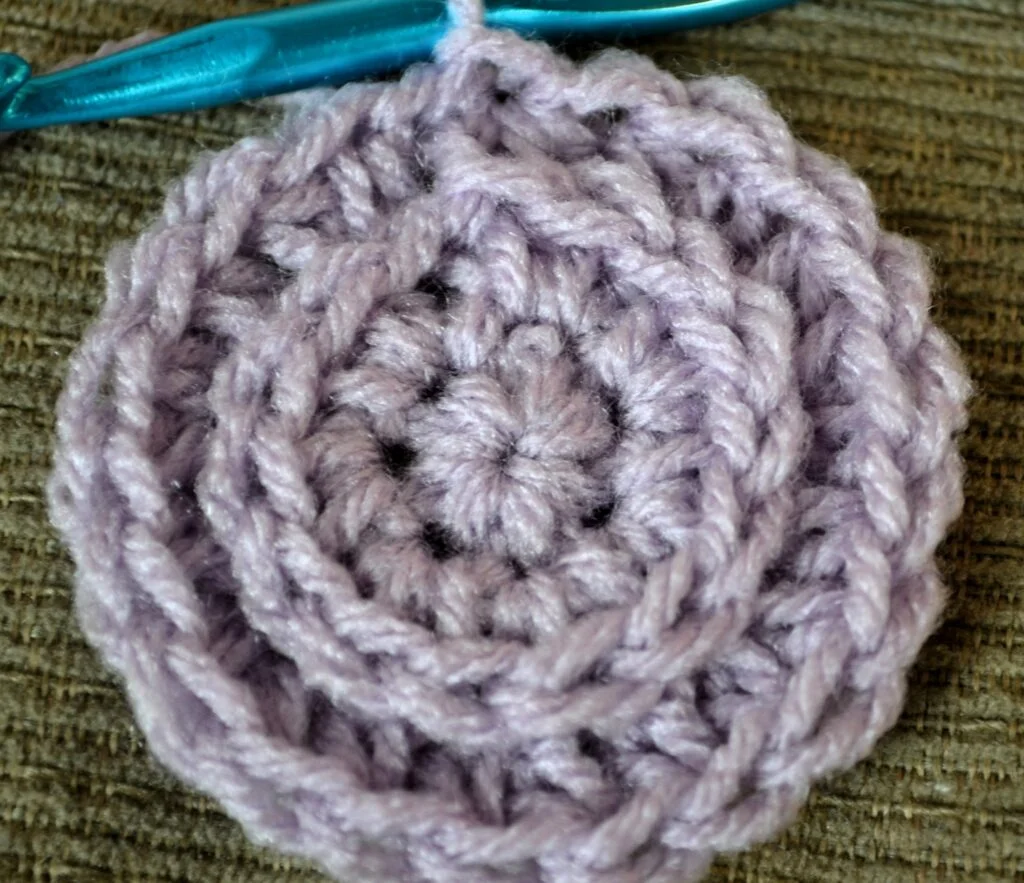
Then complete your hdc. This is also what the inside of the hat and cocoon looks like when it’s done — the ridges are the whole aesthetic, so don’t fight them:
How the pattern is built
Both pieces are worked inside out — the side that’s normally the “wrong” side is the visible side. Rounds 1 and 2 are worked normally; from round 3 on, every stitch is made in the back bar of the previous round. That’s what creates the ridged, bug-shell texture.
Don’t count the beginning chain of the rounds. When the pattern says “repeat [ ] around,” repeat the bracketed group.
One thing that looks like a mistake but isn’t: the cocoon turns on random rows. That’s on purpose — the turns are what build up the ridges. If one round turns and the next doesn’t, keep going.
My sample note: the photos in the pattern vary slightly — I added 2 more rows of purple to the cocoon to reach the right length. Check your length as you go and trust the measurements over the row count.
Hat pattern
Size: 12 ½” circumference (6 ¼” laid flat), 5 ½” tall. Use hook K (6.50mm) and your main color.
R1: Ch 2, 7 sc in 1st ch, join (7 sts). Pulling the beginning strand cinches the hole closed — or substitute a magic ring if that’s your preference.
R2: Ch 1, 2 hdc in each st around, join (14).
From here on, work in the back bar (BB) of the hdc from the previous round.
R3: Ch 1, 2 BBhdc in same st joined in, BBhdc in next st, [2 BBhdc in next st, BBhdc in next st] repeat around, join (21).
R4: Ch 1, 2 BBhdc in same st joined in, BBhdc in next 2 sts, [2 BBhdc in next st, BBhdc in next 2 sts] repeat around, join (28).
R5: Ch 1, 2 BBhdc in same st joined in, BBhdc in next 3 sts, [2 BBhdc in next st, BBhdc in next 3 sts] repeat around, join (35).
R6–12: Ch 2, BBhdc in each st around, join (35).
R13: Ch 1, sc in each st around, join (35). Fasten off and weave in ends.
Antennae (make 2)
Use hook I (5.50mm) and a contrasting color. Ch 12, slst in 2nd ch from hook and each remaining ch, fasten off leaving enough yarn to sew them on.
Finishing the hat
Supplies and cut-outs:
Keep the hat inside out — the backside of the stitches is the design face. Sew both antennae to the top of the hat, between rounds 1 and 2.
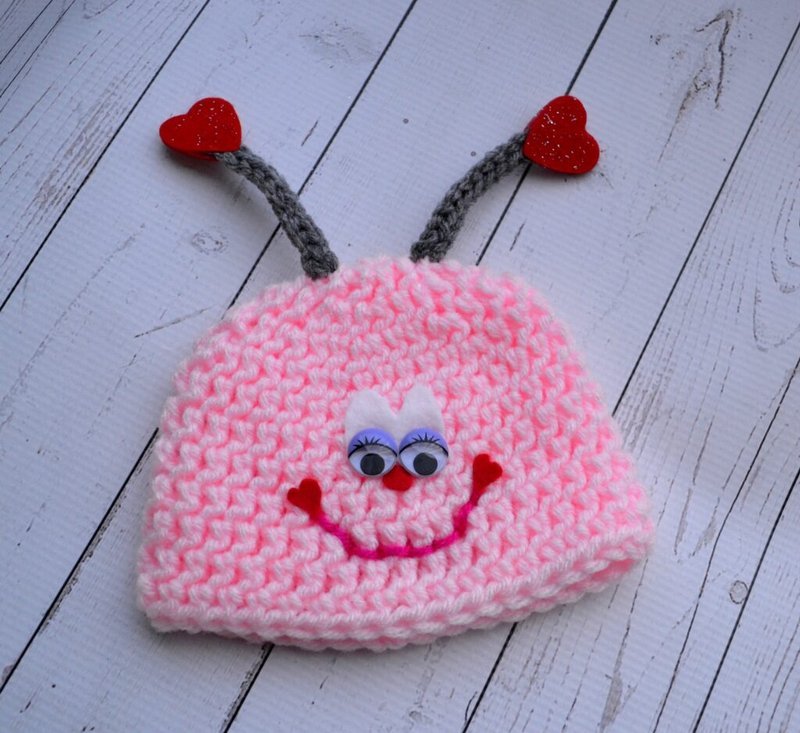
Embroider a small smile on the center front: I used yellow yarn, 2 rows high and about 7 stitches wide.
From pink felt, cut: 1 small circle (nose), 2 small hearts (tips of the smile), 4 medium hearts (antenna ends).
From white felt: cut a 2″ square, fold it in half, and cut an oval — leave one side attached at the fold. That’s the eye shape.
Glue a medium heart to the front tip of each antenna, turn the hat over, and glue the other side of each antenna. A clothespin holds the felt flat while it dries.
Glue the small hearts onto the tips of the smile, then glue the white felt eyes on and sew a row above the smile tips. Nose goes just barely below the eyes. Lay a heavy book on top until the glue dries.
Fully assembled:
Cocoon pattern
Finished size: 14″ around (7″ laid flat), 14″ long. Use hook L (7.00mm) and your main color.
R1: Ch 2, 8 sc in 2nd ch from hook, join (8). Pull the beginning strand to cinch — or use a magic ring.
R2: Ch 1, 2 hdc in each st around, join (16).
From here on, work in the back bar (BB) of the hdc from the previous round.
R3: Ch 1, 2 BBhdc in 1st st, BBhdc in next st, [2 BBhdc in next st, BBhdc in next st] repeat to end, join (24).
R4: Ch 1, 2 BBhdc in 1st st, BBhdc in next 2 sts, [2 BBhdc in next st, BBhdc in next 2 sts] repeat to end, join (32).
R5: Ch 1, 2 BBhdc in 1st st, BBhdc in next 3 sts, [2 BBhdc in next st, BBhdc in next 3 sts] repeat to end, join (40).
R6–7: Ch 1, BBhdc in each st around, join and TURN (40).
R8: Ch 1, BBhdc in each st around, join and TURN (40).
R9: Switch to pink. Ch 1, BBhdc in each st around, join (40).
R10: Ch 1, hdc in each st around, join and TURN (40).
R11: Switch to purple. Ch 1, BBhdc in each st around, join (40).
R12: Switch to green. Ch 1, BBhdc in each st around, join and TURN (40).
R13: Switch to yellow. Ch 1, BBhdc in each st around, join (40).
R14–15: Ch 1, BBhdc in each st around, join (40).
R16: Switch to purple. Ch 1, BBhdc in each st around, join (40).
R17: Ch 1, BBhdc in each st around, join and TURN (40).
R18: Switch to blue. Ch 1, BBhdc in each st around, join and TURN (40).
R19: Switch to green. Ch 1, BBhdc in each st around, join (40).
R20: Switch to yellow. Ch 1, BBhdc in each st around, join (40).
R21: Ch 1, BBhdc in each st around, join (40).
R22: Switch to pink. Ch 1, BBhdc in each st around, join and TURN (40).
R23: Ch 1, BBhdc in each st around, join (40).
R24: Ch 1, BBhdc in each st around, join and TURN (40).
R25: Switch to blue. Ch 1, hdc in each st around, join and TURN (40).
R26: Switch to purple. Ch 1, BBhdc in each st around, join (40).
R27: Ch 1, BBhdc in each st around, join (40).
R28: Switch to green. Ch 1, hdc in each st around, join and TURN (40).
R29: Switch to purple. Ch 1, hdc in each st around, join (40).
Check your length here: if it measures 14″, fasten off. If it’s not quite there, finish the last 3 rounds.
R30–31: Ch 1, BBhdc in each st around, join (40).
R32: Ch 1, sc in each st around, join (40). Fasten off and weave in all ends.
My honest take
Is this the most practical thing you’ll ever crochet? No — it’s a photo prop, and photo props have a job to do, not a decade of wear ahead of them. But the cost-per-photograph is basically nothing: a few dollars of yarn scraps, a sheet of felt you’ll use again, and one focused afternoon. That’s a good trade for a picture that’ll live on a fridge for years.
If you’re between seasons and the stash is growing faster than your projects, this is the one I’d start with.
FAQ
Confident beginners, yes. The back-bar technique takes a round or two to get comfortable with — the photos above show exactly where the hook goes. Everything else is repeating rounds.Can a beginner make this?
No. It’s sized for newborns (approx. 7–10 lbs): the hat fits up to a 14″ head circumference. For a bigger baby, you’d need to work up rounds and re-check the measurements — the pattern is sized for one purpose, and that’s its strength.Will it fit an older baby?
It’s a photography prop, not sleepwear. Keep a hand on it during the session — the felt pieces and glue are fine once dry, but nothing here is built for unsupervised wear.Is it safe for the baby to wear?
A note from Lena
I’ve made exactly one of these so far, and I’m not going to pretend the antennae went on straight the first time. They did on the second try. The finished set is smaller than you’d expect — and that’s what makes it work in a photo.
If you make one, I’d love to know what colors you went with. And if you’re looking for more small, fast handmade projects, my original pattern post has the full set of photos and the pattern release notes.